

quinectl
Quine Enterprise, a pluggable streaming system
I absolutely love trying out new technologies. And that was one thing that greatly attracted me to Quine Enterprise. It gave me the opportunity (well... it forced me) to try out so many different supporting services.
If I want to try out Cassandra, I can configure Quine Enterprise to use it as a persistor.
If I want to experiment with metrics, I can configure Quine Enterprise to work with InfluxDB, or even Prometheus, and use Grafana to render metrics in beautiful dashboards.
If I want to experiment with auth, I can enable RBAC in Quine Enterprise, and even spin up Keycloak to work as an identity provider.
Working at thatDot definitely scratches my itch for trying out different services. Configuring Quine Enterprise to work with them, and configuring those services to work with Quine Enterprise, feels like playing with LEGOs.
But working with so many different services, together, had its challenges.
So many services, so little time
When I first started working with Quine Enterprise, it was also my first time experimenting with spinning up all of those services I referenced. I had never actually spun up a local Cassandra, or Keycloak, or Prometheus + Grafana before, let alone configured a Quine Enterprise cluster to use them all.
Another facet to my learning was the need to learn how to use Kubernetes, since our clients tend to use Kubernetes for deployment.
I needed to learn how to configure Quine Enterprise, and its supporting services, and I started out my journey in Kubernetes.
Let me show you various ways I could configure Quine Enterprise itself, along with its supporting services, when running on a local Kubernetes cluster.
Trying out Cassandra
Let's say I wanted to configure Quine Enterprise to use Cassandra. Here is everything I would need to do:
- Write a
quine-enterprise.confthat points Quine Enterprise at a Cassandra that doesn't exist yet. - Install the cass-operator.
- Describe the Cassandra I want in
cassandra.yaml, with names that match the ones in myquine-enterprise.conf. - Write the Deployment manifest for Quine Enterprise,
quine-enterprise.yaml. It mountsquine-enterprise.conffrom a ConfigMap, and gets my license key and Cassandra's password from secrets. The operator creates the password secret for me, when it creates Cassandra. - Create a
quinenamespace, and in it, two secrets from my license key: one for the license, and one for pulling the image. - Load
quine-enterprise.confinto the ConfigMap. - Apply it all in the right order: Cassandra first, then Quine Enterprise, once Cassandra is ready.
- Forward a port, so I can open Quine Enterprise at
localhost:8080.
quine.license-key = ${QUINE_LICENSE_KEY}

quine.store {
  type = cassandra
  endpoints = [
    "quine-dc1-service.quine.svc.cluster.local:9042"
  ]
  keyspace = quine
  should-create-keyspace = true
  should-create-tables = true
  replication-factor = 1
  write-consistency = LOCAL_QUORUM
  read-consistency = LOCAL_QUORUM
  local-datacenter = "dc1"
  write-timeout = "10s"
  read-timeout = "10s"
}

datastax-java-driver.advanced.auth-provider {
  class = PlainTextAuthProvider
  username = "quine-superuser"
  password = ${CASSANDRA_PASSWORD}
}apiVersion: cassandra.datastax.com/v1beta1
kind: CassandraDatacenter
metadata:
name: dc1
namespace: quine
spec:
clusterName: quine
serverType: cassandra
serverVersion: "4.1.10"
size: 1
storageConfig:
cassandraDataVolumeClaimSpec:
storageClassName: hostpath
accessModes:
- ReadWriteOnce
resources:
requests:
storage: 5Gi
resources:
requests:
cpu: 500m
memory: 2Gi
limits:
memory: 2Gi
config:
cassandra-yaml:
authenticator: PasswordAuthenticator
authorizer: CassandraAuthorizer
jvm-server-options:
initial_heap_size: 1G
max_heap_size: 1GapiVersion: apps/v1
kind: Deployment
metadata:
name: quine-enterprise
namespace: quine
spec:
replicas: 1
strategy:
type: Recreate
selector:
matchLabels:
app: quine-enterprise
template:
metadata:
labels:
app: quine-enterprise
spec:
imagePullSecrets:
- name: thatdot-registry
containers:
- name: quine-enterprise
image: registry.license.thatdot.com/thatdot/quine-enterprise:2.2.1
ports:
- name: http
containerPort: 8080
- name: cluster
containerPort: 25520
env:
- name: JDK_JAVA_OPTIONS
value: -Dconfig.file=/etc/quine/quine-enterprise.conf
- name: QUINE_LICENSE_KEY
valueFrom:
secretKeyRef:
name: quine-enterprise-license
key: license-key
- name: CASSANDRA_PASSWORD
valueFrom:
secretKeyRef:
name: quine-superuser
key: password
resources:
requests:
cpu: 250m
memory: 1Gi
limits:
memory: 2Gi
volumeMounts:
- name: config
mountPath: /etc/quine
readinessProbe:
httpGet:
path: /api/v2/system/liveness
port: http
initialDelaySeconds: 15
livenessProbe:
httpGet:
path: /api/v2/system/liveness
port: http
initialDelaySeconds: 60
volumes:
- name: config
configMap:
name: quine-enterprise-config
---
apiVersion: v1
kind: Service
metadata:
name: quine-enterprise
namespace: quine
spec:
selector:
app: quine-enterprise
ports:
- name: http
port: 80
targetPort: httphelm repo add k8ssandra https://helm.k8ssandra.io/stable
helm upgrade --install cass-operator k8ssandra/cass-operator \
--namespace cass-operator --create-namespace \
--set global.clusterScoped=true \
--set admissionWebhooks.enabled=false --wait
kubectl create namespace quine
kubectl -n quine create secret generic quine-enterprise-license \
--from-literal=license-key=<LICENSE_KEY>
kubectl -n quine create secret docker-registry thatdot-registry \
--docker-server=registry.license.thatdot.com \
--docker-username=<CUSTOMER_ID> \
--docker-password=<LICENSE_KEY>
kubectl -n quine create configmap quine-enterprise-config \
--from-file=quine-enterprise.conf
kubectl apply -f cassandra.yaml
kubectl -n quine wait cassdc/dc1 \
--for=jsonpath='{.status.cassandraOperatorProgress}'=Ready \
--timeout=10m
kubectl apply -f quine-enterprise.yaml
kubectl -n quine rollout status deployment/quine-enterprise
kubectl -n quine port-forward svc/quine-enterprise 8080:80And that is one Quine Enterprise member, saving its graph to Cassandra.
Creating a multi-member Quine Enterprise cluster
Let's say I wanted to try out spinning up a coordinated cluster of Quine Enterprise members (which requires a distributed persistor, like Cassandra). This is how I could configure it to run a cluster locally:
- Add a
quine.clusterblock to the end of myquine-enterprise.conf, telling the members to find each other by looking up a name. - Add a Service with that name to
quine-enterprise.yaml. - Change
replicas: 1toreplicas: 4in the same file: three members, plus a hot spare. - Update the ConfigMap, apply the file again, and restart Quine Enterprise so it reads the new
quine-enterprise.conf. - Stop the port-forward and start it again, because the restart replaced the pod it pointed at.
quine.cluster {
  target-size = 3
  cluster-join {
    type = dns-entry
    name = quine-enterprise-seed
  }
}apiVersion: v1
kind: Service
metadata:
name: quine-enterprise-seed
namespace: quine
spec:
clusterIP: None
publishNotReadyAddresses: true
selector:
app: quine-enterprise
ports:
- name: cluster
port: 25520
targetPort: clusterkubectl -n quine create configmap quine-enterprise-config \
--from-file=quine-enterprise.conf \
--dry-run=client -o yaml | kubectl apply -f -
kubectl apply -f quine-enterprise.yaml
kubectl -n quine rollout restart deployment/quine-enterprise
kubectl -n quine rollout status deployment/quine-enterprise
kubectl -n quine port-forward svc/quine-enterprise 8080:80After a minute or so, my one member has become three, with a hot spare standing by.
Trying out RBAC, with Keycloak
Or if I wanted to try out RBAC, I would need to configure Quine Enterprise and Keycloak, with its persistor, like this:
- Add a
quine.authblock to the end of myquine-enterprise.conf, full of URLs for a Keycloak that isn't running yet. - Create a
keycloaknamespace, and install the Keycloak operator into it. - Create a handful of secrets: one for Keycloak's database, one for the client secret that Keycloak and Quine Enterprise share (which has to exist in both namespaces), and one for Quine Enterprise's login sessions.
- Run a small Postgres, because Keycloak needs a database of its own (so now I have a persistor for my graph, and a persistor for my auth).
- Describe the Keycloak in
keycloak.yaml, pointed at that Postgres. - Describe a realm for Quine Enterprise in
realm.yaml, with a client, the roles that Quine Enterprise uses, and a couple of sample users to log in with. These users and their passwords are for local development only. - Pass the two new secrets to Quine Enterprise as environment variables, in
quine-enterprise.yaml. - Apply the three Keycloak files, and wait for Keycloak and the realm to be ready.
- Update the ConfigMap, and apply
quine-enterprise.yamlagain. The new environment variables restart Quine Enterprise one more time, so it reads the newquine-enterprise.conf. - Forward two ports this time: one for Quine Enterprise, and one for Keycloak at
localhost:8180, because my browser has to reach both to log in.
quine.auth {
  session {
    secret = ${SESSION_SECRET}
    expiration-seconds = 3600
    secure-cookies = false
  }
  oidc.full {
    provider {
      location-url = "http://keycloak-service.keycloak.svc.cluster.local:8080/realms/quine-enterprise"
      authorization-url = "http://localhost:8180/realms/quine-enterprise/protocol/openid-connect"
      login-path = "auth"
      token-url = "http://keycloak-service.keycloak.svc.cluster.local:8080/realms/quine-enterprise/protocol/openid-connect/token"
      access-token-audience = "quine-enterprise-client"
    }
    client {
      id = "quine-enterprise-client"
      secret = ${OIDC_CLIENT_SECRET}
    }
  }
}apiVersion: apps/v1
kind: StatefulSet
metadata:
name: postgres
namespace: keycloak
spec:
serviceName: postgres
replicas: 1
selector:
matchLabels:
app: postgres
template:
metadata:
labels:
app: postgres
spec:
containers:
- name: postgres
image: postgres:17
ports:
- containerPort: 5432
env:
- name: POSTGRES_DB
value: keycloak
- name: POSTGRES_USER
valueFrom:
secretKeyRef:
name: keycloak-db
key: username
- name: POSTGRES_PASSWORD
valueFrom:
secretKeyRef:
name: keycloak-db
key: password
- name: PGDATA
value: /var/lib/postgresql/data/pgdata
volumeMounts:
- name: data
mountPath: /var/lib/postgresql/data
volumeClaimTemplates:
- metadata:
name: data
spec:
accessModes:
- ReadWriteOnce
resources:
requests:
storage: 1Gi
---
apiVersion: v1
kind: Service
metadata:
name: postgres
namespace: keycloak
spec:
selector:
app: postgres
ports:
- port: 5432apiVersion: k8s.keycloak.org/v2beta1
kind: Keycloak
metadata:
name: keycloak
namespace: keycloak
spec:
instances: 1
db:
vendor: postgres
host: postgres
database: keycloak
usernameSecret:
name: keycloak-db
key: username
passwordSecret:
name: keycloak-db
key: password
http:
httpEnabled: true
hostname:
hostname: http://localhost:8180
backchannelDynamic: true
ingress:
enabled: falseapiVersion: k8s.keycloak.org/v2beta1
kind: KeycloakRealmImport
metadata:
name: quine-enterprise
namespace: keycloak
spec:
keycloakCRName: keycloak
placeholders:
QUINE_CLIENT_SECRET:
secret:
name: quine-enterprise-oidc
key: client-secret
realm:
realm: quine-enterprise
enabled: true
clients:
- clientId: quine-enterprise-client
secret: ${QUINE_CLIENT_SECRET}
protocol: openid-connect
publicClient: false
standardFlowEnabled: true
directAccessGrantsEnabled: true
serviceAccountsEnabled: true
redirectUris:
- http://localhost:8080/*
- http://localhost:8080/api/v2/auth/callback
webOrigins:
- http://localhost:8080
protocolMappers:
- name: roles
protocol: openid-connect
protocolMapper: oidc-usermodel-client-role-mapper
config:
usermodel.clientRoleMapping.clientId: quine-enterprise-client
claim.name: roles
jsonType.label: String
multivalued: "true"
access.token.claim: "true"
id.token.claim: "true"
userinfo.token.claim: "true"
- name: "audience: quine-enterprise-client"
protocol: openid-connect
protocolMapper: oidc-audience-mapper
config:
included.client.audience: quine-enterprise-client
access.token.claim: "true"
id.token.claim: "true"
roles:
client:
quine-enterprise-client:
- name: SuperAdmin
- name: SRE
- name: Architect
- name: DataEngineer
- name: Analyst
- name: Billing
users:
- username: superadmin1
enabled: true
email: superadmin1@example.com
firstName: Test
lastName: SuperAdmin
credentials:
- type: password
value: superadmin123
clientRoles:
quine-enterprise-client:
- SuperAdmin
- username: analyst1
enabled: true
email: analyst1@example.com
firstName: Test
lastName: Analyst
credentials:
- type: password
value: analyst123
clientRoles:
quine-enterprise-client:
- Analyst - name: SESSION_SECRET
valueFrom:
secretKeyRef:
name: quine-enterprise-session
key: secret
- name: OIDC_CLIENT_SECRET
valueFrom:
secretKeyRef:
name: quine-enterprise-oidc
key: client-secretkubectl create namespace keycloak
kubectl apply -f https://raw.githubusercontent.com/keycloak/keycloak-k8s-resources/26.6.1/kubernetes/keycloaks.k8s.keycloak.org-v1.yml
kubectl apply -f https://raw.githubusercontent.com/keycloak/keycloak-k8s-resources/26.6.1/kubernetes/keycloakrealmimports.k8s.keycloak.org-v1.yml
kubectl -n keycloak apply -f https://raw.githubusercontent.com/keycloak/keycloak-k8s-resources/26.6.1/kubernetes/kubernetes.yml
kubectl -n keycloak create secret generic keycloak-db \
--from-literal=username=keycloak \
--from-literal=password=<DB_PASSWORD>
for ns in keycloak quine; do
kubectl -n $ns create secret generic quine-enterprise-oidc \
--from-literal=client-id=quine-enterprise-client \
--from-literal=client-secret=<CLIENT_SECRET>
done
kubectl -n quine create secret generic quine-enterprise-session \
--from-literal=secret=<SESSION_SECRET>
kubectl apply -f postgres.yaml -f keycloak.yaml -f realm.yaml
kubectl -n keycloak wait keycloak/keycloak \
--for=condition=Ready --timeout=10m
kubectl -n keycloak wait keycloakrealmimport/quine-enterprise \
--for=condition=Done --timeout=10m
kubectl -n quine create configmap quine-enterprise-config \
--from-file=quine-enterprise.conf \
--dry-run=client -o yaml | kubectl apply -f -
kubectl apply -f quine-enterprise.yaml
kubectl -n quine rollout status deployment/quine-enterprise
kubectl -n keycloak port-forward svc/keycloak-service 8180:8080 &
kubectl -n quine port-forward svc/quine-enterprise 8080:80Now Quine Enterprise sends me to Keycloak to log in, and what I can do depends on the role of the user I log in as.
Kubernetes operators are great, but...
Learning how to provision and manipulate services using Kubernetes operators felt rather magical. When I wanted to provision Cassandra, I declared the shape of my Cassandra deployment using cass-operator's CassandraDatacenter custom resource. When I wanted to provision Keycloak, I did the same thing using the Keycloak operator's Keycloak custom resource.
But there were some issues I had with this route of managing my Quine Enterprise services.
First, I was tied to Kubernetes, which is pretty heavyweight, when I simply wanted to iterate and develop Quine Enterprise, while configuring it in various different ways. While the different operators I used were incredibly convenient, I couldn't use them outside of Kubernetes.
Second, this was still a lot of configuration and setup. I needed to learn about the operators for each supporting service, and then install them into the Kubernetes cluster, and then, in the correct order, provision services. Like, I needed to deploy Postgres before deploying Keycloak, for example. And I needed to configure and deploy Quine Enterprise only after all the supporting services themselves were up and ready.
It sure would be nice if I could step away from Kubernetes, and make deploying Quine Enterprise with its supporting services even easier. The Keycloak and Cassandra operators both allowed me to declare the shape of those services. I could imagine how beautiful a world it could be if I could simply declare, in a YAML file, how I wished to configure Quine Enterprise, and its supporting services, all in one file, all without Kubernetes.
Configuration frustration
One Friday afternoon, I ended the week reflecting on how the most frustrating part of my job was simply orchestrating these services, repeatedly... again, and again.
I created repos so that others on the team would not need to worry about figuring out how to launch Keycloak and Cassandra and configuring them all just right for Quine Enterprise.
I used different Kubernetes technologies, like Helm and Kustomize, and learned ArgoCD along the way, and loved each step of the way.
But they still left me with this nagging feeling that I still needed to constantly pull in knowledge from many places, every single time I needed to spin up Quine Enterprise in a different way. Every time I needed to decide or configure things slightly differently, I would need to research and reconfigure.
Having AI helped, and certainly, a lot of the pain I felt began to very slowly shrink, because Claude could configure everything for me. But it was such a waste of tokens to ask Claude to configure, and reconfigure, again and again. I still had that dream of a single config file to rule them all, so to speak.
If I had a tool like that, then I wouldn't need Claude to configure everything for me. Claude could use that tool, and save on tokens and context.
quinectl is born
I felt like I just couldn't continue another week of feeling this way. It was time to create the tool I'd dreamt of. I had learned to love using kubectl to manipulate my k8s clusters. But now it was time to create quinectl, to rid me of my Kubernetes shackles, so I could freely run and configure Quine Enterprise however I wanted, along with its supporting services.
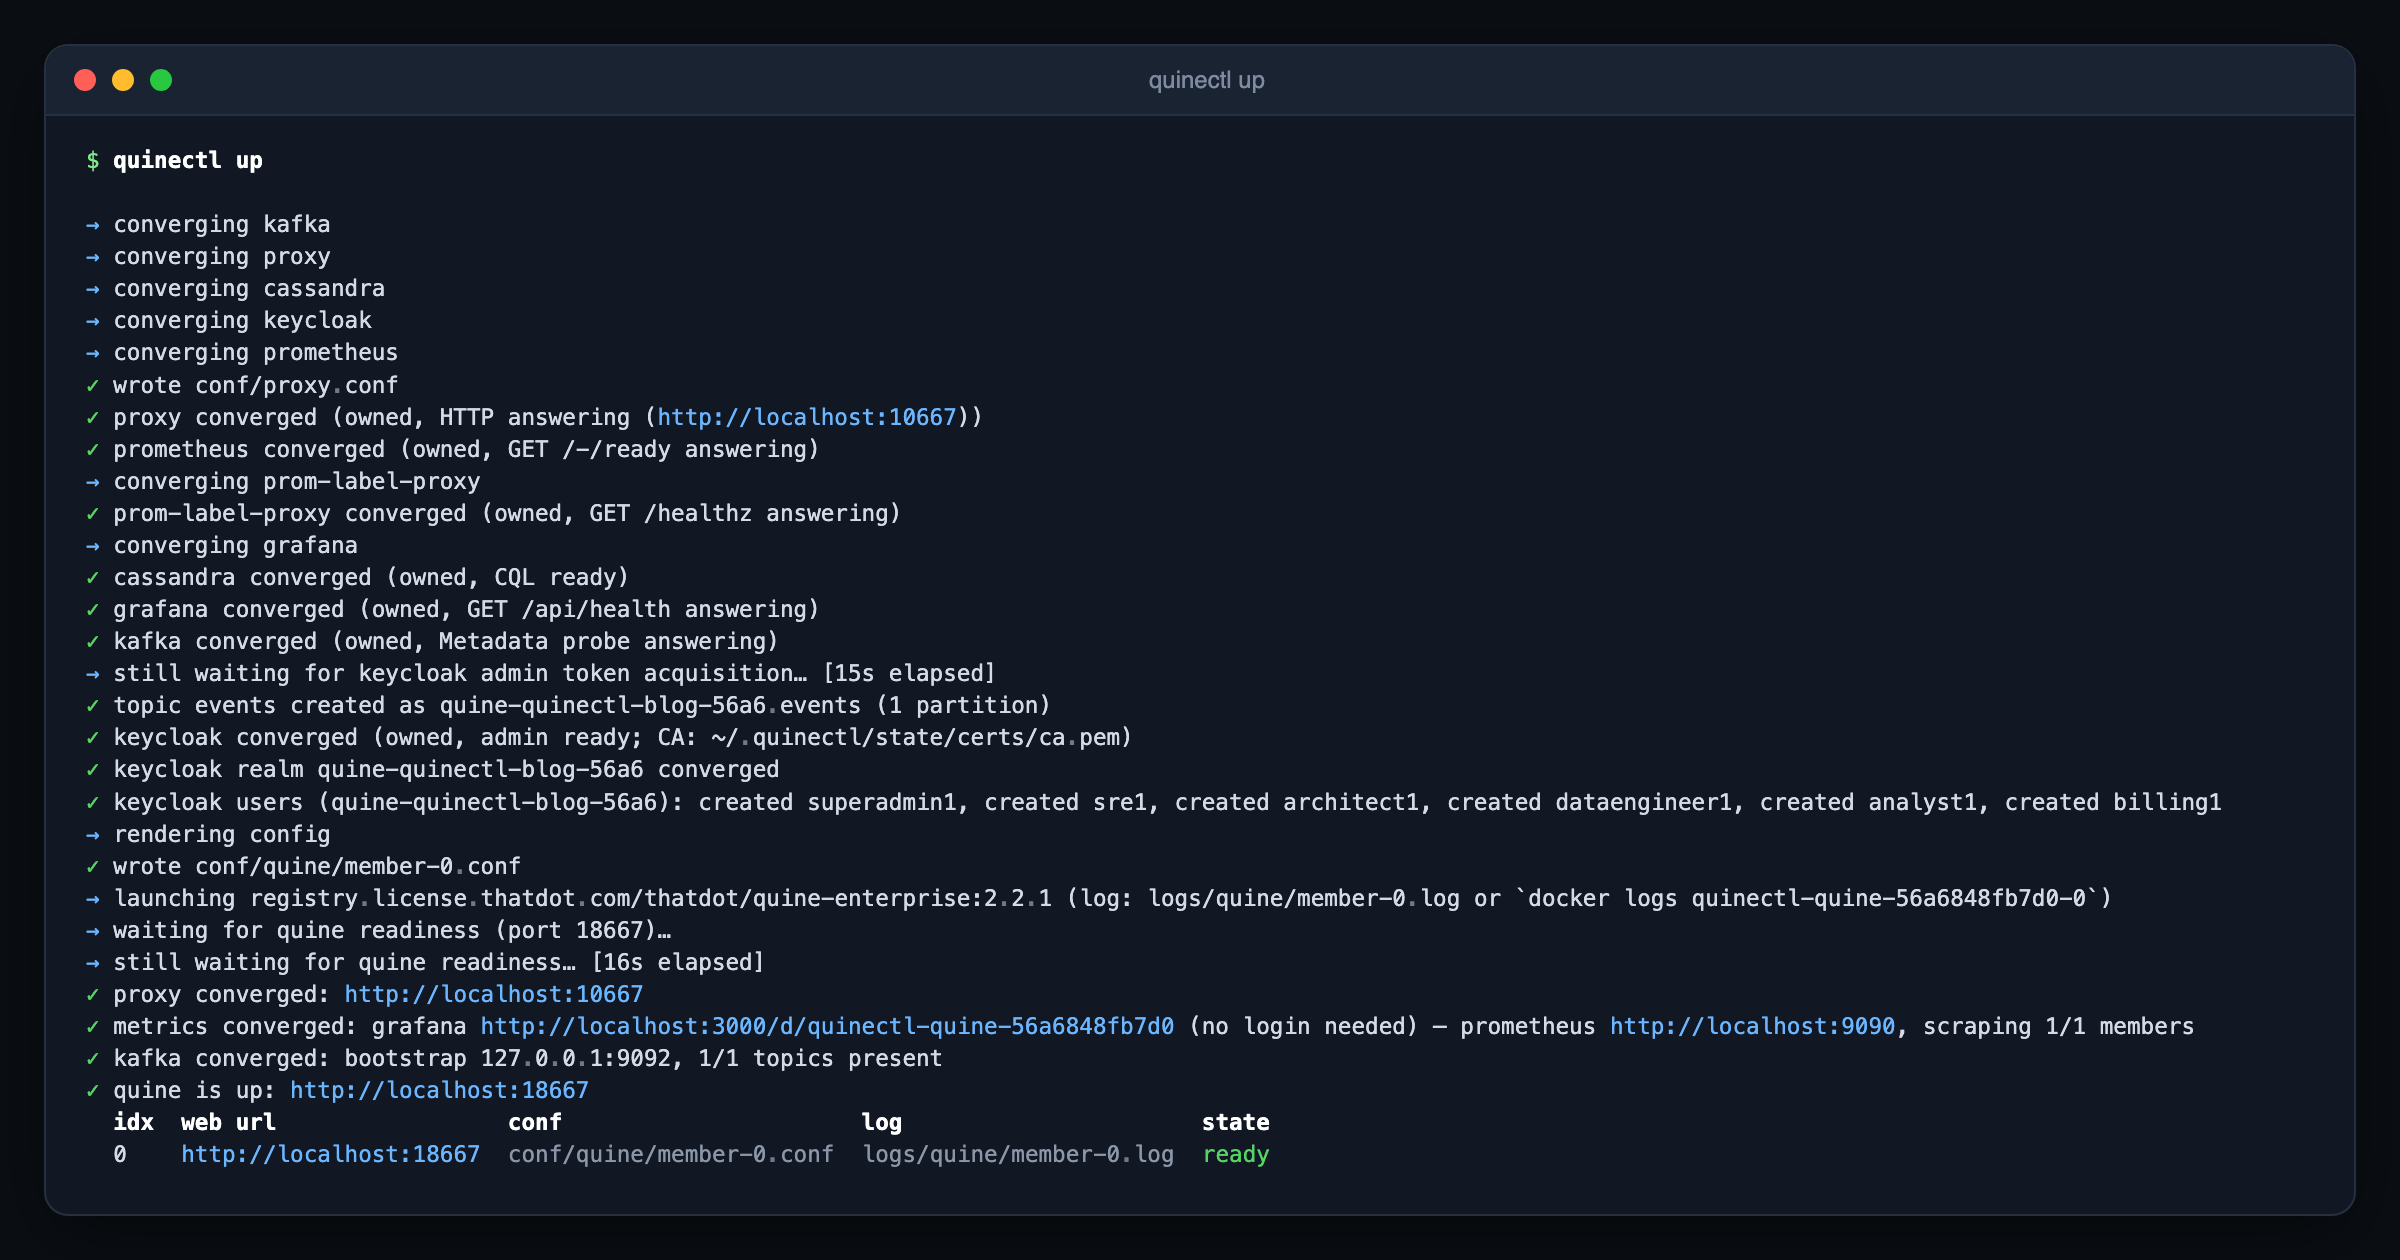
It started as a pet project. I spent a weekend thinking about what it would be like to take the core thing I loved about Kubernetes, which was the idea of a tool, similar to the Kubernetes operators I used, which could reconcile the services I needed, using just the Docker Engine. My goal was to be able to orchestrate, with just a configuration file, Quine Enterprise, along with any other service I might need to support it. I pulled together my various repos filled with scripts and Kubernetes manifests, picked up Go (because that seemed to be the language of cloud services, like Docker and Kubernetes), and then created my first prototype. quinectl was born.
An example
Scroll back up and re-check out how to stand up a 3-member, 1-hot-spare Quine Enterprise cluster, with Cassandra as the persistor, and RBAC enabled with Keycloak. It's a lot of configuration, spread across six files, which must be applied in twenty-three steps, in the correct order.
Here is how to do the same thing with quinectl. Create the following quinectl.yaml file:
quine:
  edition: enterprise
  licenseKey: ${QE_LICENSE_KEY}
  customerId: ${QE_CUSTOMER_ID}
  cluster:
    size: 3
    hotSpares: 1
services:
  persistor: cassandra
  auth: keycloak
  proxy: none
  metrics: none
  kafka: none
That is the whole thing. The cluster I want is defined under the cluster block, Cassandra is one line, and Keycloak is one line. My license key and customer id come from my environment, so there are no secrets for me to create.
Then, quinectl up.
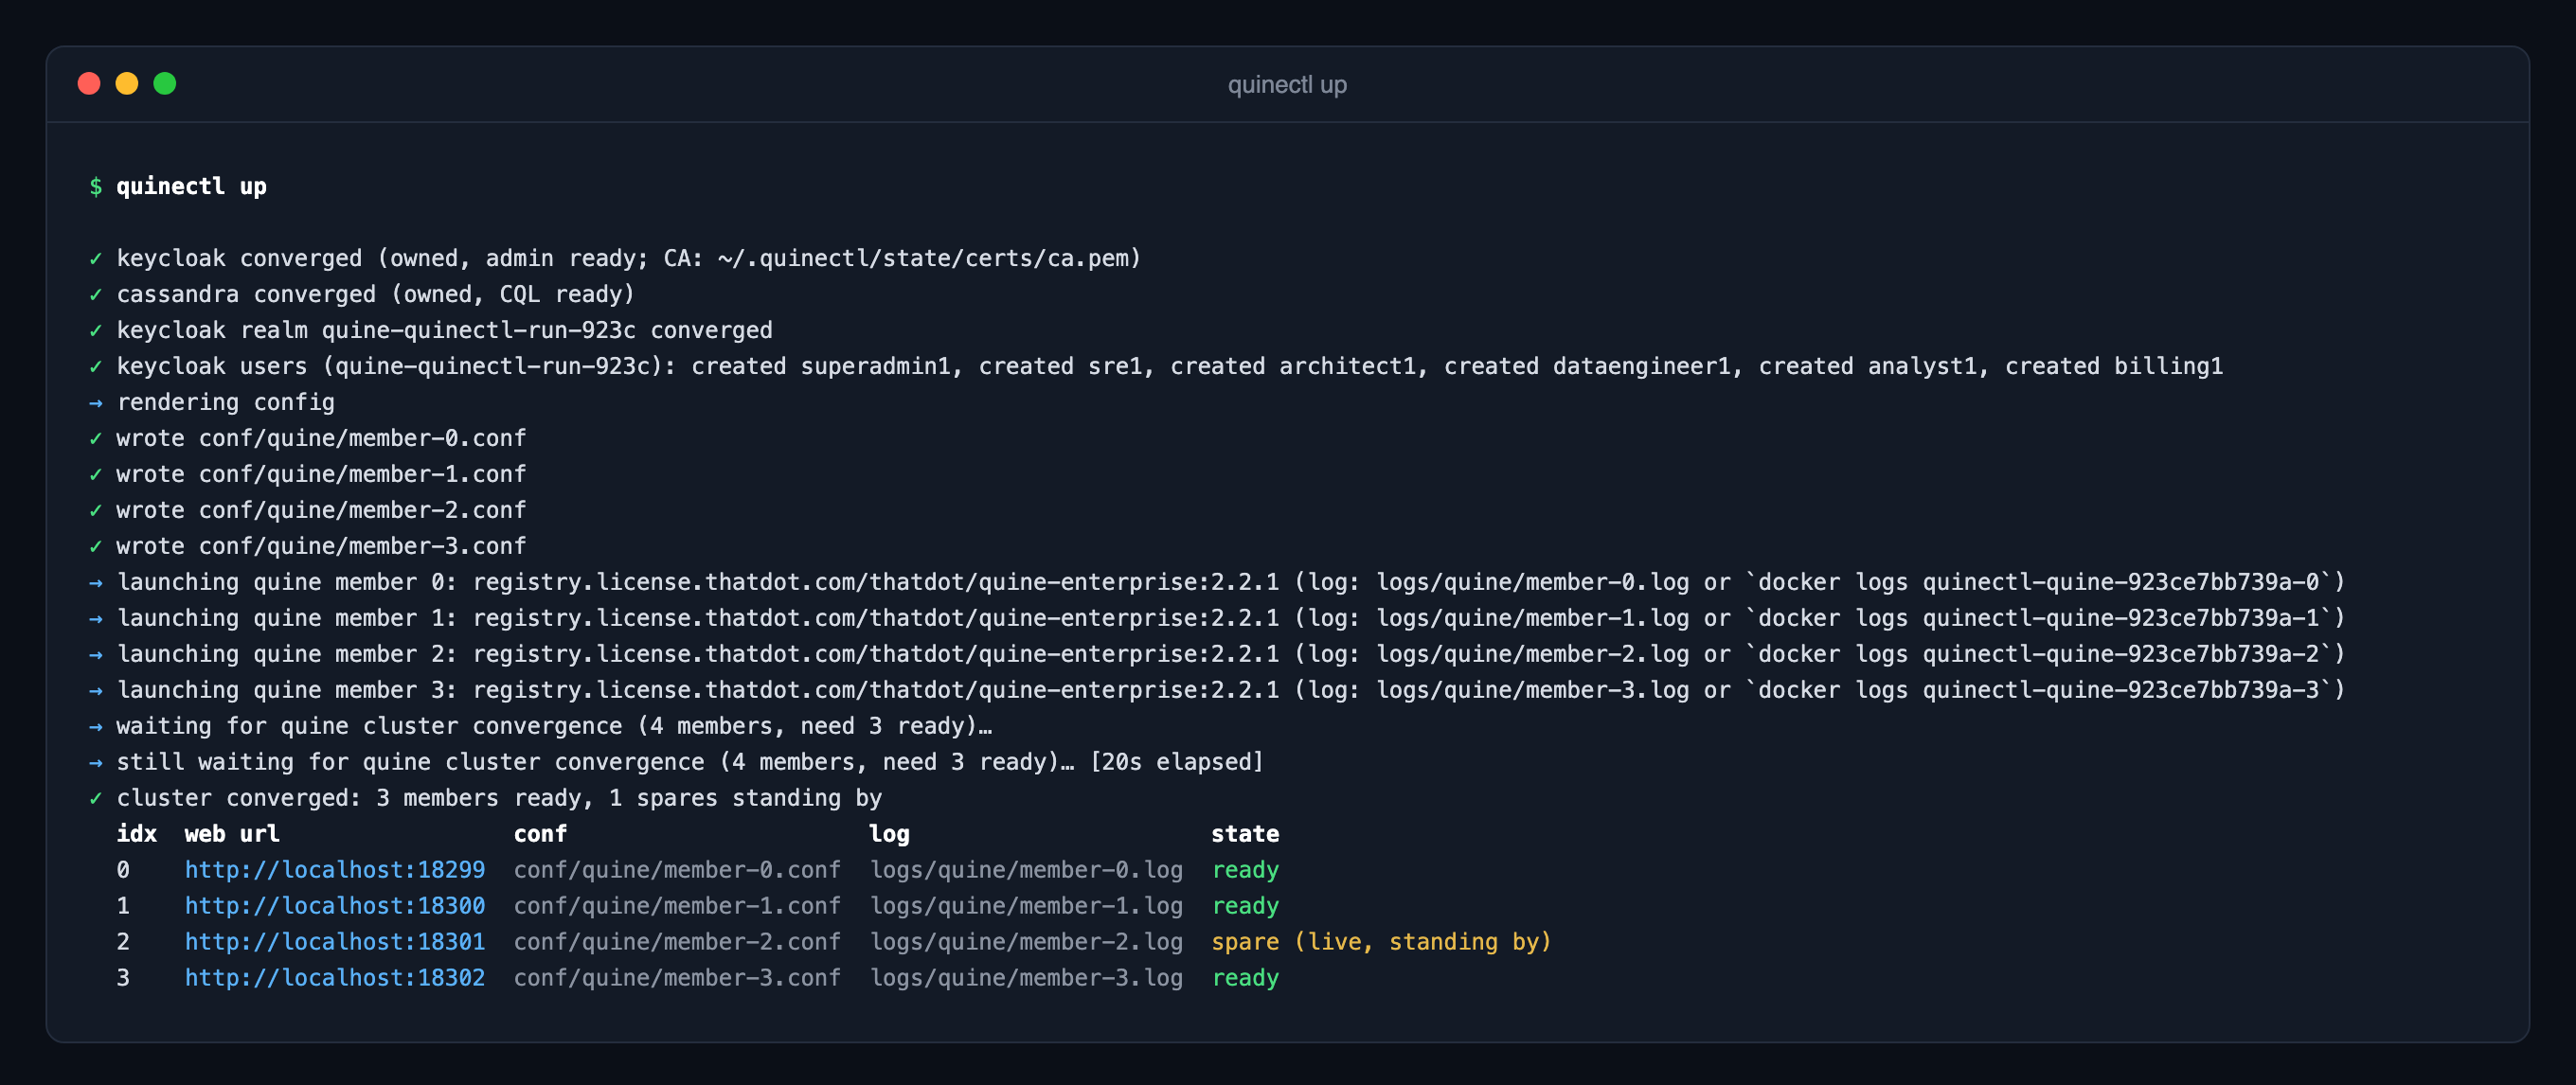
And that is 3 Quine Enterprise members, with a hot spare standing by, persisting the graph to Cassandra, with RBAC enabled via Keycloak.
I didn't install any operators and I didn't write any other config files besides the single quinectl.yaml file. quinectl wrote a config file for each member, and it started everything in the correct order for me: Cassandra and Keycloak first, then the realm with a sample user for each role (for local development only), and then the members, only after the services they needed were ready.
If I change my mind about any of it, I change the file, and quinectl up again.
Let's say I wasn't happy with the default users in Keycloak, and wanted to create a custom user, named MattDot, with Billing and SRE permissions.
I could adjust the quinectl.yaml to the following, and then re-run quinectl up:
quine:
  edition: enterprise
  licenseKey: ${QE_LICENSE_KEY}
  customerId: ${QE_CUSTOMER_ID}
  users:
    - {username: MattDot, password: "${MATTDOT_PASSWORD}", roles: [Billing, SRE]}
  cluster:
    size: 3
    hotSpares: 1
services:
  persistor: cassandra
  auth: keycloak
  proxy: none
  metrics: none
  kafka: none
That is two new lines. The password comes from my environment, just like my license key does, so it never ends up in the file.
export MATTDOT_PASSWORD=<a password>
quinectl up
This time, quinectl up had a lot less to do:
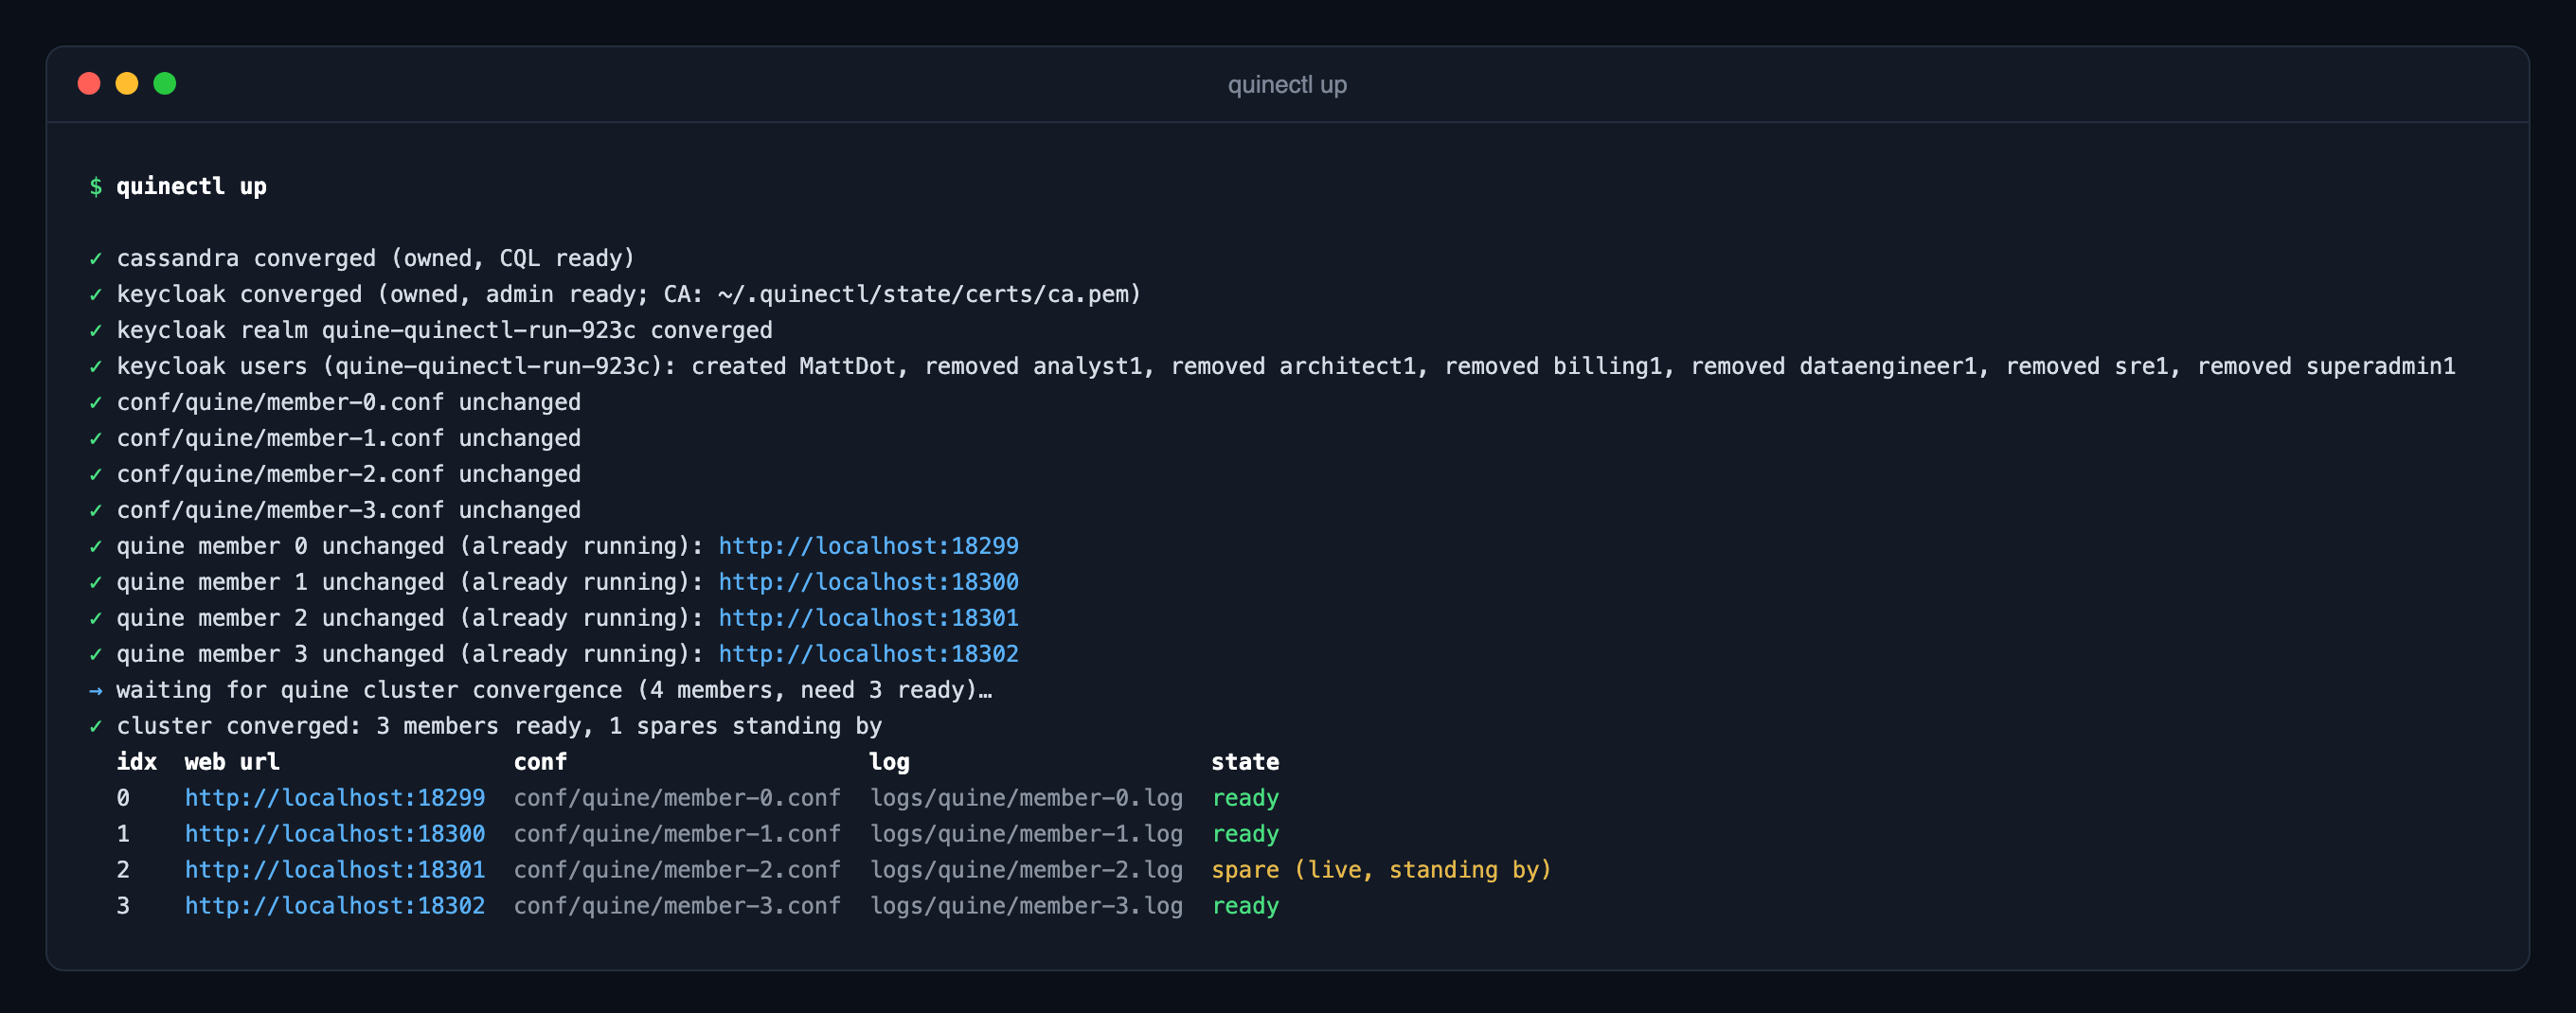
quinectl looked at what was already running, compared it to my file, and changed only the difference. It created MattDot, and it removed the sample users, because my list of users replaces the default one. Cassandra, Keycloak, and all four members were left alone, still running.
Released, for Enterprise users
quinectl started as a tool to ease all of the configuration and orchestration I needed, just to simply stand up Quine Enterprise in various ways. But using it after the first few days, and iterating on it as I kept adding features, made me want to share this with all enterprise users.
So quinectl, just like Quine Enterprise and Novelty, is available for enterprise users today. If you have a license key that can pull and run Quine Enterprise or Novelty, you can use that same license key to pull and try out quinectl. quinectl has even been extended to support Novelty as well, so get yourself a Novelty key too, and run Quine Enterprise along-side Novelty, all from one config file!